Best Auto Repair for Faulty Headlights and Tail Lights
It’s happened to all of us: you’re driving down the road, and suddenly you notice that one of your headlights or tail lights isn't working. Whether it’s a dim light, a flickering bulb, or a completely dead light, dealing with faulty car lights can be both frustrating and dangerous. As a car owner, it’s essential to fix these issues as soon as possible to ensure your safety and the safety of others on the road. In this article, I’ll walk you through the best ways to repair faulty headlights and tail lights, whether you decide to tackle the problem yourself or seek professional help.
Snow's Auto Repair Center
324 W Chapman Ave, Orange, CA 92866, USA
1. Understanding the Importance of Headlights and Tail Lights
Headlights and tail lights are crucial for visibility and safety when driving, especially at night or in poor weather conditions. They not only help you see the road clearly but also ensure that other drivers can see you. Malfunctioning lights can lead to accidents, fines, or even worse, so it’s important to address any issues promptly. I once had a situation where my tail light went out on a rainy night, and I was lucky enough not to get pulled over or cause an accident. That experience taught me the importance of maintaining functioning lights on my vehicle at all times.
Auto-Tech Inc
2611 N 84th St, Omaha, NE 68134, USA
2. Common Issues with Headlights and Tail Lights
Before diving into the solutions, let’s first identify some common issues that can cause your headlights and tail lights to malfunction:
- Burned-Out Bulbs: The most common issue with headlights and tail lights is a burned-out bulb. Over time, the filament inside the bulb can break, causing the light to stop working.
- Flickering Lights: A flickering light can be a sign of a loose connection, a failing bulb, or an issue with the car’s wiring system.
- Dim Lights: If your headlights or tail lights are dimming, it could be due to a failing alternator, a weak battery, or corrosion in the electrical system.
- Water Damage: If your tail lights or headlights are exposed to water, it can cause internal corrosion, leading to malfunctioning lights.
- Electrical Problems: A faulty fuse, loose wiring, or a malfunctioning relay can disrupt the function of your headlights or tail lights.
In my experience, the most common problem I’ve faced is a burnt-out bulb. However, I’ve also dealt with the frustration of flickering lights, and I’ll walk you through how to fix those as well.
3. How to Fix Faulty Headlights and Tail Lights Yourself
If you’re the DIY type, you might want to try fixing your headlights or tail lights yourself. Fortunately, many headlight and tail light issues are relatively simple to fix, and you don’t need to be an expert mechanic to do it. Here’s a step-by-step guide on how to repair the most common problems.
Step 1: Gather the Necessary Tools
Before you begin, make sure you have the right tools for the job. Here’s what you’ll need:
- New headlight or tail light bulbs
- Flathead screwdriver
- Socket wrench set
- Electrical tape (for wiring issues)
- Replacement fuse (if necessary)
- Gloves (to keep the bulb clean and prevent oils from your skin from damaging it)
Step 2: Check the Bulb
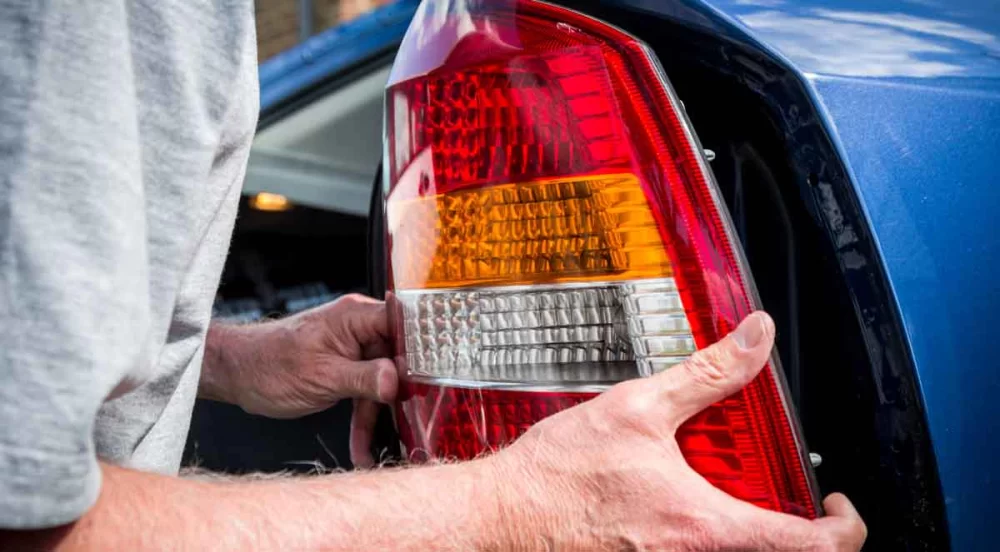
The most likely cause of a faulty light is a burned-out bulb. To check if this is the case, first turn off your car and remove the keys. Then, access the bulb by removing the cover or panel around the headlight or tail light. You may need to unscrew a few bolts or screws to get to it.
Once the bulb is exposed, remove it and inspect it for any signs of damage. If the filament inside the bulb is broken, it's time for a replacement. Be sure to use the correct replacement bulb for your vehicle model. If you’re unsure which one to get, refer to your vehicle’s manual or ask an auto parts store for assistance.
Step 3: Replace the Bulb
Insert the new bulb into the socket, making sure it’s securely in place. Avoid touching the glass part of the bulb with your fingers, as the oils from your skin can cause the bulb to burn out prematurely. After the bulb is installed, replace the cover or panel and test the light by turning on your car.
Step 4: Fix Flickering Lights
If your headlights or tail lights are flickering, it could be a sign of a loose connection. Start by checking the wiring connections to ensure they are tight and free from corrosion. If the connections seem secure, it may be an issue with the light relay or fuse. A blown fuse can cause inconsistent lighting, so if you suspect this is the problem, consult your vehicle’s manual to find the fuse for your headlights or tail lights and replace it if necessary.
Step 5: Deal with Water Damage
If water has entered your headlight or tail light assembly, you might notice condensation inside the lens. This can lead to electrical corrosion over time. To fix this, remove the light assembly and let it dry out completely. You can also use a hairdryer on a low setting to speed up the drying process. Once it’s dry, check for any signs of rust or corrosion and clean it off. If the damage is severe, you might need to replace the entire assembly.
4. When to Seek Professional Help
While fixing your headlights and tail lights yourself can save you money, there are times when it’s best to leave the job to a professional. If the issue seems to be more complicated than a simple bulb replacement, or if you’re dealing with electrical problems, a certified mechanic can diagnose and fix the problem safely.
In my case, after I fixed the bulb on one of my tail lights, I ran into an issue with my wiring that I couldn’t resolve on my own. I ended up taking my car to a trusted mechanic who was able to repair the wiring and get the light working again. It was definitely worth the extra cost to ensure the repair was done properly and safely.
5. Preventing Future Headlight and Tail Light Issues
Once you’ve fixed your headlights and tail lights, you’ll want to ensure they stay in good working condition. Regular maintenance and inspections can help prevent future issues:
- Regularly clean the lens: Dirt and debris can accumulate on your headlights and tail lights, making them less effective. Clean them periodically to maintain visibility.
- Inspect the wiring: Check the wiring around your lights for signs of wear or corrosion. Keeping the wiring in good condition can prevent electrical issues.
- Check the fuses: Fuses control the flow of electricity to your lights. Inspect them regularly and replace them if necessary.
By following these tips, you can extend the life of your headlights and tail lights and keep your vehicle safe on the road.