How to Properly Test a Car Battery Before Replacing It
As a car owner, I’ve learned that not all car problems are immediately obvious, and sometimes what seems like a dead battery might be something else entirely. When my car started having trouble starting, I found myself wondering if I needed a new battery or if there was another underlying issue. Instead of jumping straight into a replacement, I decided to properly test the battery to avoid unnecessary expenses. Over the years, I’ve realized that testing your car battery can save you time and money, and it's a relatively simple process that any car owner can do. In this post, I’ll share my experience and explain how you can properly test your car battery before replacing it.
sql复制1. Understanding the Importance of Testing Your Car Battery
Before jumping into the testing process, it’s important to understand why testing your car battery is necessary. A battery might appear to be dead because of a variety of reasons, such as dirty terminals, loose connections, or other electrical issues. Replacing the battery without testing it could end up being a waste of money if the issue lies elsewhere. I remember when I was in a rush to get my car started, but I realized later that the problem was just a loose battery terminal, not a dead battery at all. Knowing how to test your car battery properly can save you from unnecessary repairs.

NTB-National Tire & Battery
6315 Prentiss School Dr, Canal Winchester, OH 43110, USA
1.1. Avoiding Unnecessary Expenses
Getting a new car battery can be expensive, so it’s worth making sure that the battery is indeed the issue before you replace it. I’ve been in situations where I thought my car’s battery was dead, only to discover that the issue was something simple like a faulty alternator or a blown fuse. Testing your battery first is an easy and inexpensive way to avoid paying for a replacement when it might not be necessary. When in doubt, testing will help confirm whether or not your battery is the real culprit.

Pep Boys
1200 W Washington Blvd, Los Angeles, CA 90007, USA
1.2. Extending the Life of Your Car Battery
One thing I’ve learned over time is that taking care of your battery can significantly extend its lifespan. By testing your battery regularly, you can detect issues early on and address them before they cause bigger problems. Regular checks can help you avoid sudden breakdowns and ensure your vehicle runs efficiently. I’ve made it a habit to check my battery’s health every few months, especially before long trips, just to be safe.
2. What You Need to Test Your Car Battery
Testing a car battery requires a few simple tools that you can easily find in most car tool kits or at an auto parts store. Here’s what I recommend having on hand:
2.1. Multimeter or Voltmeter
A multimeter (or voltmeter) is essential for measuring the voltage of your car battery. I used to rely on the simplest tools, but when I started using a multimeter, I noticed that I could get a much more accurate reading. This tool allows you to check the battery’s charge and determine if it’s running at full capacity or if it’s undercharged. It’s an investment I recommend to any car owner for regular maintenance.
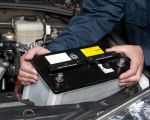
2.2. Battery Terminal Cleaner
Before testing the battery, it’s essential to ensure that the battery terminals are clean and free from corrosion. I’ve often found that corrosion around the battery terminals can prevent proper readings and affect the battery’s performance. A terminal cleaner is a simple tool that helps clean away any rust or corrosion, ensuring a reliable connection between the battery and the rest of the electrical system.
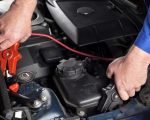
2.3. Safety Gloves and Eyewear
Battery acid can be dangerous, so it’s important to protect yourself while testing your battery. I always make sure to wear gloves and safety glasses when working around the battery. This precaution is especially necessary when cleaning the terminals or handling the battery directly. While testing the battery itself is safe, it’s always better to err on the side of caution when working with vehicle components.
3. How to Test Your Car Battery
Now, let’s get to the actual process of testing your car battery. There are several methods you can use, but the most common and reliable method is using a multimeter. Below is the step-by-step process I follow to check my car’s battery health:
3.1. Turn Off the Engine
Before you begin testing, make sure the engine is turned off. It’s a simple step, but one that ensures your multimeter readings are accurate and that you’re not measuring electrical current while the engine is running. I always double-check to ensure that the ignition is off before proceeding with any testing.
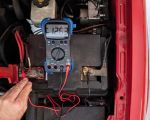
3.2. Check the Battery Voltage
Using a multimeter, set it to measure DC voltage (denoted by “V” with a straight line underneath). Place the red (positive) lead on the positive terminal of the battery and the black (negative) lead on the negative terminal. A healthy, fully charged car battery should read around 12.6 volts when the car is off. When I tested mine, I found that a voltage reading of 12.4V-12.6V indicated a healthy charge. If the voltage is under 12V, the battery may be undercharged, and if it’s below 11.8V, it could indicate a dead battery that needs replacing.
3.3. Test the Battery Under Load
To simulate the real-world performance of your battery, it’s essential to check the voltage under load. This test simulates what happens when you’re using your car’s electrical system, like when you start the engine or use other components. To perform this test, you can have someone start the car while you measure the voltage with the multimeter. The voltage should drop momentarily but then return to around 12.6V. If it drops significantly below 12V and doesn’t recover, the battery is likely weak and may need to be replaced.
3.4. Check the Alternator’s Output
While testing your battery, it’s also a good idea to check the alternator. The alternator is responsible for charging the battery while the engine runs. To do this, keep the multimeter connected as you start the engine, and check the voltage. A healthy alternator should produce around 13.7 to 14.7 volts. If you see a reading outside of that range, your alternator could be malfunctioning, which can affect your battery’s ability to charge properly.
4. What to Do Based on Your Test Results
Once you’ve tested your car battery, the results will help guide your next steps. Depending on the voltage readings and performance under load, here’s what I typically do:
4.1. If the Battery Reads 12.4V or Higher
If your battery reads 12.4V or higher and holds the voltage under load, it’s likely still in good condition. In this case, I recommend continuing to monitor the battery’s performance and ensuring that the alternator is functioning properly. However, it’s always good to keep an eye on the battery over time to prevent unexpected failures.
4.2. If the Battery Reads Between 12V and 12.4V
If your battery reads between 12V and 12.4V, it could indicate that the battery is slightly undercharged. You can try charging the battery fully and then re-test it. If the battery still doesn’t hold a full charge, it might be time to replace it, especially if it’s more than a few years old.
4.3. If the Battery Reads Below 12V
If your reading is below 12V or the battery doesn’t hold a charge, it’s likely time for a replacement. In my experience, a battery that consistently reads below 12V is struggling to hold a charge and may fail soon. If you're unsure, it’s worth taking the battery to a professional for further testing.