Dealing with a loose exhaust pipe is a common issue that many car owners face. Whether you're experiencing strange noises, a decrease in fuel efficiency, or just a general sense that something's off with your car, the exhaust pipe could be the culprit. In this article, I’ll walk you through the process of repairing a loose exhaust pipe yourself, sharing personal insights from my own experience fixing the issue. You’ll get a better understanding of the tools needed, the steps involved, and the precautions you should take to ensure a successful repair.
When I first noticed a rattling noise coming from the underside of my car, I didn’t think much of it at first. However, as time passed, the noise became more pronounced. I finally decided to inspect the exhaust system, and that’s when I discovered that my exhaust pipe was loose. In the beginning, it might seem like a small issue, but a loose exhaust pipe can cause a lot of long-term damage if not addressed. Not only can it affect the performance of your vehicle, but it can also contribute to higher emissions and increased fuel consumption. So, I knew I had to fix it.
The task of fixing a loose exhaust pipe may seem intimidating at first, but it’s actually a fairly straightforward process that can be done in your own driveway or garage with the right tools. In the following steps, I will explain the process I went through and provide tips and tricks along the way to help you achieve a proper repair.

J&J Auto Repair
2879 Lockbourne Rd, Columbus, OH 43207, USA
1. Gather Your Tools and Materials
Before starting the repair, I made sure I had all the necessary tools and materials. Here’s a list of everything you’ll need for the job:
- Jack and jack stands
- Wrench set
- Exhaust clamp or muffler clamp
- Exhaust pipe hanger or rubber mounting bracket
- WD-40 or penetrating oil
- Heat-resistant gloves
- Work light or flashlight
- Pipe cutters or a hacksaw (optional)
- Metal file (optional)
With the right tools in hand, I was ready to tackle the job. It's always important to be prepared because working without the proper tools can make the task much harder and could even result in an incomplete or unsafe repair.

Lopez Auto Repair
1290 W Mound St, Columbus, OH 43223, USA
2. Lift the Car
Since the exhaust pipe is located underneath the car, the first step I took was lifting the vehicle. I used a jack to lift the car and placed it securely on jack stands. It’s crucial to ensure the car is stable before working under it to avoid any accidents. If you don’t feel comfortable working under a raised car, it’s always better to have a professional mechanic do the job for you.
Once the car was elevated, I positioned myself underneath it and carefully examined the exhaust system. This is the time to look for any other potential issues like rust or cracks in the exhaust pipe that might need attention during the repair process.
3. Inspect the Exhaust System
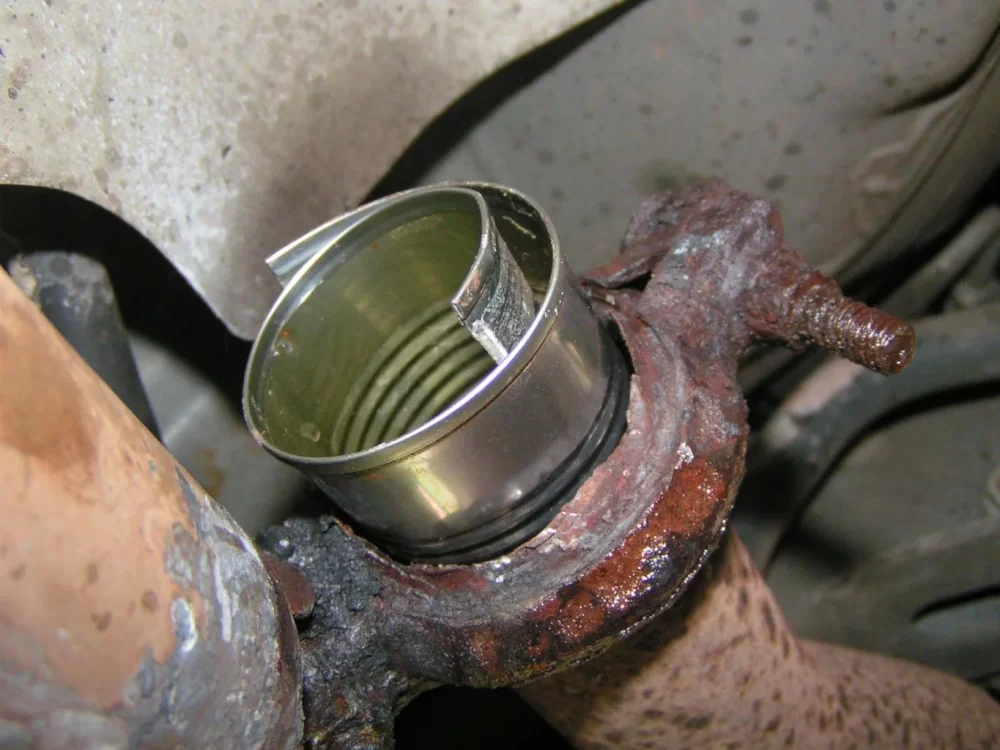
Before attempting any repairs, it’s important to determine the exact cause of the problem. For me, the exhaust pipe was loose because one of the mounting brackets had either rusted away or come loose from its bolt. I sprayed some WD-40 onto the joints to loosen any rusted or stuck bolts. After a few minutes, I was able to easily unscrew the bolts holding the exhaust pipe in place. Once the pipe was free, I could get a better look at the mounting points to see what was wrong.
While inspecting, I also checked for any cracks in the pipe or other signs of damage. If you notice any cracks, holes, or rust that cannot be repaired, you may need to replace the affected section of the pipe instead of simply tightening the mounting bracket. At this point, I found that the pipe was in decent condition, so I didn’t need a replacement section, just a proper fix for the loose connection.
4. Secure the Exhaust Pipe
After confirming that the pipe itself was in good condition, the next step was securing the exhaust pipe. For this, I used a new exhaust clamp to hold the pipe in place. The clamp helps to tightly seal the pipe, preventing any further loosening. I slid the clamp around the area where the pipe connects to the muffler or catalytic converter, depending on the location of the looseness. I then tightened the clamp securely with a wrench.
If the exhaust pipe had been disconnected from a rubber mounting bracket, I would have replaced that as well. These brackets hold the pipe in place, preventing it from moving around too much. I made sure to check that the bracket was in good condition and, if necessary, I replaced it with a new one to prevent future issues.
5. Tighten All Bolts and Check for Leaks
Once the exhaust pipe was secured in place, I proceeded to tighten all the bolts holding the exhaust system together. It’s important to make sure the bolts are tightened properly, but be careful not to overtighten them, as this can cause damage to the threads or the exhaust system itself. After tightening, I gave everything a final inspection to ensure that everything was in place and secure.
The last step in the process was checking for leaks. I started the car and listened carefully for any unusual sounds, like hissing or a loud exhaust note. These sounds can indicate an exhaust leak, which could still exist even after securing the pipe. If you hear any signs of a leak, I recommend rechecking the pipe’s connections or using a specialized exhaust sealant to fill in any gaps.
6. Test Drive
Finally, after I had finished everything, I took the car for a test drive. This is a crucial step because it allows you to confirm that the repair is holding up under normal driving conditions. During the test drive, I kept an ear out for any rattling or unusual noises that might indicate that the pipe has come loose again.
If everything feels and sounds good during the test drive, I knew I had completed the repair successfully. The car was now running smoothly again, and the exhaust system was functioning properly without any loose parts causing a disturbance.
Repairing a loose exhaust pipe isn’t as difficult as it might initially seem. With a little time, the right tools, and some patience, anyone can do it. The most important thing to remember is to work carefully and take the necessary precautions, like using jack stands and inspecting the entire exhaust system before proceeding with the repair.
By doing this repair yourself, you not only save money on labor costs, but you also gain a better understanding of your car’s exhaust system. If you’re ever in doubt, it’s always a good idea to consult a professional mechanic for advice, but in my case, this DIY fix worked perfectly, and my car is back to running like new again.