How to Replace a Broken Car Window: A Complete Step-by-Step Guide
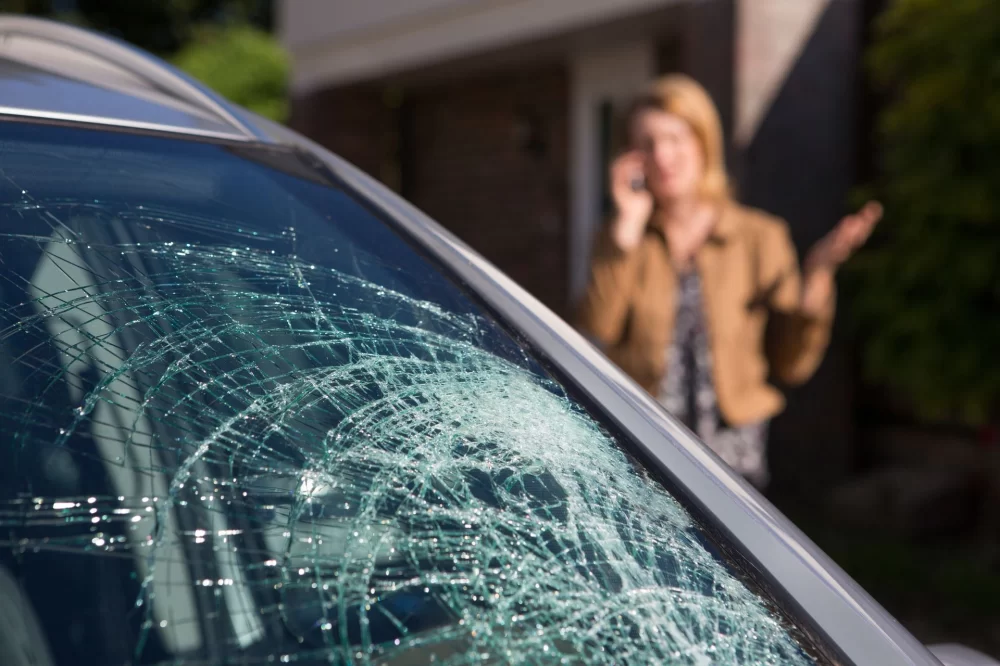
Dealing with a broken car window can be a frustrating and stressful experience, especially when it happens unexpectedly. Whether it’s due to an accident, a break-in, or the wear and tear of everyday driving, you’ll want to fix the window as soon as possible to protect your vehicle and maintain its integrity. Having gone through this myself, I understand the anxiety that comes with trying to repair or replace a window in your car, but it’s not as difficult as you might think. In this guide, I’ll walk you through the steps involved in replacing a broken car window and offer tips to help you along the way.

Window Film Depot - Home & Commercial Window Tint
80 Broad St floor 5, New York, NY 10004, USA
Why Replace a Broken Car Window Yourself?
At first glance, replacing a car window might seem like a job for a professional, but the truth is, with the right tools and some patience, it’s entirely possible to replace it yourself. I remember the first time I had to replace a shattered window after my car was vandalized. At the time, I thought about calling a repair service, but after a bit of research and some helpful tutorials, I realized I could tackle the job myself. This not only saved me money, but it also gave me the satisfaction of knowing I had done it on my own.
There are some clear advantages to DIY window replacement. Aside from the cost savings, doing the job yourself means you can have full control over the quality of the repair. Also, it can be a great learning experience for anyone interested in vehicle maintenance.

Omaha Window Films Co.
4535 Grover St, Omaha, NE 68106, USA
1. Gather the Necessary Tools and Materials
Before you begin the replacement process, you’ll need to gather all the necessary tools and materials. Here’s a list of what you’ll need:
- Replacement window (make sure to order the correct size and type for your vehicle)
- Window removal tool or suction cups
- Rubber mallet or hammer
- Trim removal tools
- Adhesive or sealant (if required by your car model)
- Safety gloves
- Protective eyewear
- Clean rags or cloths
- Plastic or trash bags (to cover the window area temporarily)
Once you’ve got everything prepared, make sure you’re working in a safe, clean environment. It’s always a good idea to wear safety gloves and protective eyewear, especially when dealing with broken glass.
2. Remove the Broken Window
The first step in replacing a broken car window is to remove the damaged glass. Be careful during this process, as broken glass can be sharp and dangerous. Start by using a suction cup tool or a window removal tool to gently lift the remaining shards of glass out of the frame.
If the glass is severely shattered, you’ll need to remove any large pieces carefully using the trim removal tool. Gently pry away any plastic or trim pieces around the window frame to expose the full area where the window was located.
Once you’ve removed all of the broken glass, clean the window frame thoroughly. I used a rag soaked in warm soapy water to get rid of any remaining shards and dirt. It’s crucial to ensure the surface is clean so the new window adheres properly.
3. Prepare the Replacement Window
Now that the old window is out, it’s time to prepare the replacement. If you’ve ordered a custom window, ensure it’s the right fit for your vehicle. You’ll want to check that it matches the shape and size of the old window precisely. Place the replacement window next to the opening to verify the fit before proceeding.
Some vehicles may require additional adhesive or sealant to keep the new window in place. Make sure to follow the instructions for the sealant carefully to avoid any issues down the line. In my case, I needed to apply a small amount of adhesive along the edges of the window frame to help secure the glass in place.
4. Install the New Window
With the window ready and the frame clean, it’s time to install the new glass. This can be the trickiest part, but with a bit of patience, it’s very doable. Start by aligning the window with the frame and gently sliding it into place. Depending on the type of window and vehicle, you may need someone to help you hold the window steady while you secure it. I found that using suction cups worked well for holding the window in place while I focused on securing it with the adhesive.
Once the window is in position, press it firmly into place to ensure it’s secure. Some vehicles might require you to replace the trim or weather stripping around the window. In this case, replace any components that were removed earlier, and make sure everything fits snugly.
5. Test the Window
Once the new window is installed, test it to make sure it’s functioning properly. If it’s a powered window, check the functionality of the motor and ensure the window slides smoothly up and down. If it’s a manual window, make sure the crank mechanism is working without resistance. You don’t want to rush this step—testing the window before finishing ensures there are no issues later on.
6. Clean Up and Final Touches
Now that the window is installed and functioning correctly, it’s time to clean up. Carefully dispose of the broken glass, and clean the entire window area. You’ll want to ensure no glass fragments are left behind to avoid future issues. Wipe down the new window with a clean cloth, and make sure it’s free of smudges or fingerprints.
If your vehicle has any weather seals or trim that were removed, reinstall them now. You want to ensure that the window is sealed correctly to prevent any air or water from getting in. Once everything is back in place, take a moment to step back and admire your work!
Replacing a broken car window can seem daunting at first, but with the right tools and a bit of patience, it’s a task that most car owners can handle on their own. Not only will you save money on labor costs, but you’ll gain valuable experience in maintaining your car. If you don’t feel comfortable doing it yourself, however, there are always professional auto repair services available to help you out.
If you need assistance with towing your vehicle or finding the right repair services, be sure to check out [Rescue & Towing] for professional help and recommendations. Getting your car back on the road with a new window has never been easier!