How to Replace a Damaged Brake Rotor: A Step-by-Step Guide
One of the most crucial parts of any vehicle is its braking system. As drivers, we rely on our brakes to stop us safely every day, but what happens when something goes wrong with your brakes, like a damaged brake rotor? I found myself in this situation not long ago, and let me tell you, it was a wake-up call. A damaged brake rotor can significantly impact your car’s ability to stop effectively, making it a safety concern. In this article, I’m going to walk you through the process of replacing a damaged brake rotor, share my personal experience, and provide valuable tips on how to perform this repair yourself if you're up for the challenge. If you're not quite comfortable doing it yourself, I’ll also explain how professional services like towing and emergency roadside assistance can help you out.

Brake Masters
24411 Main St, Santa Clarita, CA 91321, USA
1. What Is a Brake Rotor and Why Is It Important?
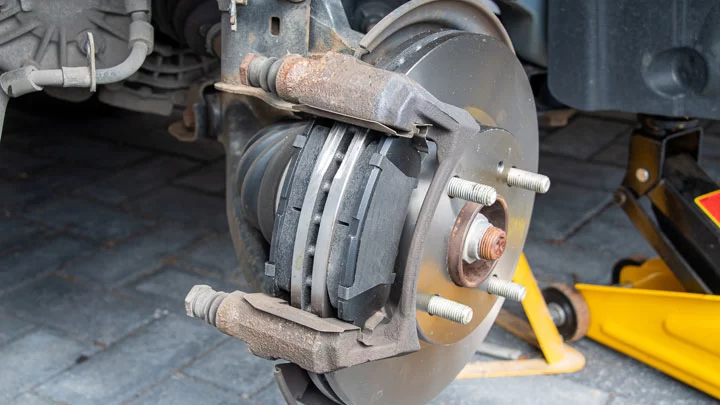
Before diving into how to replace a damaged brake rotor, let’s take a moment to understand what a brake rotor is and why it's so important. The brake rotor is a key component of your car’s braking system. It’s the flat, disc-shaped part that the brake pads clamp onto when you press the brake pedal. This creates friction that slows down and stops the wheels from turning. When a rotor becomes damaged, warped, or worn down, the efficiency of the braking system is compromised, leading to longer stopping distances and less control over the vehicle. If you’ve ever heard a grinding sound while braking, there’s a good chance your rotors are in bad shape.

Little D's Muffler & Brakes
2970 S Winchester Blvd, Campbell, CA 95008, USA
1.1 Common Causes of Brake Rotor Damage
There are several reasons why your brake rotors might become damaged. In my case, I didn’t realize how much my driving habits were affecting the lifespan of my rotors. Constantly driving in stop-and-go traffic or slamming on the brakes in an attempt to avoid accidents can cause the rotors to heat up and warp over time. Additionally, excessive wear from old brake pads or failing to get regular brake maintenance can accelerate rotor damage. Other factors include exposure to moisture or road salt, which can lead to rusting, and even an improper brake pad installation.
1.2 Signs of a Damaged Brake Rotor
So, how can you tell if your brake rotor is damaged? In my case, I started noticing some unusual sounds coming from my car whenever I applied the brakes. It sounded like metal scraping against metal, which I later learned was the brake pads grinding against the damaged rotor. If you hear grinding noises, feel vibration when braking, or notice that your car pulls to one side when stopping, those are all signs that your rotors may need to be replaced. Additionally, if you’ve driven for a while without checking your rotors, excessive scoring, or grooves on the rotor surface can also indicate damage.
2. How to Replace a Damaged Brake Rotor
Now that we’ve established why brake rotors are important and how to recognize when they’re damaged, let’s dive into the process of replacing them. Replacing a brake rotor isn’t the simplest task, but with the right tools and a little patience, it can be done. I’ll walk you through the steps I took when replacing the rotors on my car.
2.1 Tools and Equipment You’ll Need
Before you start, make sure you have all the necessary tools. Here’s a list of what you’ll need:
- Car jack and jack stands
- Socket wrench set
- Brake rotor puller (if needed)
- New brake rotors and pads
- Brake cleaner
- Torque wrench
- Rubber mallet
- Flathead screwdriver
Once you have your tools ready, follow these steps:
2.2 Step 1: Lift the Vehicle and Remove the Wheel
The first step in replacing your brake rotor is to safely lift your vehicle using a car jack and secure it with jack stands. This will allow you to remove the wheel and access the brake components. Make sure the car is on a flat surface and the parking brake is engaged to prevent any movement. Once the car is lifted, remove the lug nuts from the wheel and take it off.
2.3 Step 2: Remove the Brake Caliper and Pads
Next, you’ll need to remove the brake caliper, which holds the brake pads in place. This can be done using your socket wrench. Be cautious when removing the caliper, as it may be heavy. You can either hang the caliper from a bungee cord or rest it on the suspension to avoid damaging the brake line. Once the caliper is removed, take out the brake pads as well, as they will likely need replacing along with the rotor.
2.4 Step 3: Remove the Old Brake Rotor
Now that you’ve removed the caliper and pads, it’s time to remove the old brake rotor. In some cases, the rotor may come off easily, but in other cases, it could be rusted or stuck. If it’s stubborn, you can use a rubber mallet to tap around the edges of the rotor to loosen it. If necessary, use a brake rotor puller to safely remove the rotor without causing damage to surrounding components. Once removed, inspect the hub for any rust or debris and clean it thoroughly before proceeding.
2.5 Step 4: Install the New Brake Rotor
Once the old rotor is removed, it’s time to install the new one. Place the new rotor onto the hub, making sure it’s properly aligned. Some rotors have a small screw hole that holds it in place, but not all do. If your rotor doesn’t have a screw hole, simply ensure it fits securely. Once in place, you may want to clean the rotor with brake cleaner to remove any protective oil coating that manufacturers apply to prevent rusting during storage.
2.6 Step 5: Reassemble the Brake System
Now that your new rotor is in place, it’s time to reassemble the brake system. Start by reinstalling the brake pads into the caliper. Be sure that they’re positioned correctly, and that there’s no excessive friction or rubbing against the rotor. Then, carefully reattach the brake caliper, ensuring it’s securely fastened with the appropriate bolts. Tighten everything using a torque wrench to ensure the proper tightness and avoid over-tightening, which can damage the components.
2.7 Step 6: Reinstall the Wheel and Test the Brakes
Once the caliper and pads are in place, you can reinstall the wheel. Use the socket wrench to hand-tighten the lug nuts, lower the vehicle back onto the ground, and then tighten the lug nuts in a crisscross pattern with a torque wrench. After everything is securely fastened, it’s important to test the brakes before hitting the road. Gently press the brake pedal to ensure the system feels firm and responsive. If everything feels good, you’re ready to go!
3. When to Call a Professional
While replacing a brake rotor can be a relatively straightforward task for someone with mechanical experience, it’s important to acknowledge when it’s best to call a professional. If you’re unsure about your ability to complete the task, or if you don’t have the proper tools, it’s always a good idea to take your vehicle to a mechanic. Additionally, if you’re dealing with other brake system issues such as a malfunctioning master cylinder or brake lines, a professional mechanic should handle those repairs to ensure your safety.
In my case, I decided to handle the brake rotor replacement myself because I had a bit of experience working on my car. However, if I had run into complications or felt unsure about the process, I would have called a tow service or a professional mechanic for assistance.
4. The Importance of Regular Brake Maintenance
Having gone through the process of replacing a brake rotor myself, I can’t stress enough how important it is to maintain your brake system regularly. If I had kept a close eye on the brake fluid levels, brake pads, and rotors earlier, I might have caught the issue before it became a bigger problem. Regular brake maintenance helps extend the life of your components, prevents more costly repairs down the line, and most importantly, ensures your safety on the road.
If you’re not comfortable performing brake repairs yourself, don’t hesitate to call a professional. Many towing services offer assistance with brake repairs, and can even take your vehicle to a trusted mechanic. Whether you’re doing it yourself or relying on professional help, keeping your brake system in top condition is key to safe driving.