Replacing a car battery can seem like a daunting task, but trust me, it’s not as difficult as it sounds. In fact, I was able to replace my own car battery without any professional help, and I’ll walk you through exactly how I did it. With a little bit of preparation and the right tools, you’ll be able to do it too. Here’s a detailed, step-by-step guide on how to replace your car battery safely and efficiently. Whether you're dealing with a dead battery or simply want to replace an old one, this guide will help you take control of your car maintenance without paying for costly labor.
Before I get into the actual process, it's important to understand why replacing a car battery might be necessary. Over time, a car battery will lose its ability to hold a charge, and eventually, it will fail to start the vehicle. Extreme weather conditions, leaving your lights on, or even age can cause a battery to deteriorate faster. A new battery typically lasts anywhere from three to five years, depending on the make and model of your vehicle. In my case, my car was having trouble starting, and I noticed the battery wasn’t holding a charge for long, so I decided it was time for a replacement. Now, let’s dive into the steps.

Pick Your Part - Help Yourself
1232 Blinn Ave, Wilmington, CA 90744, USA
Step 1: Gather the Necessary Tools
The first thing you need to do is gather all the tools you’ll need for the job. The list isn’t long, and you likely already have most of these items in your garage. Here's what you'll need:
- Wrenches: You’ll need a wrench or socket set to loosen and tighten the battery terminals.
- Safety gloves: Car batteries contain acid, and you don’t want to accidentally spill it or come into contact with it. Gloves will protect your hands from any harmful substances.
- Safety glasses: It’s a good idea to wear glasses to protect your eyes in case of any acid splashes or debris flying around.
- Battery terminal cleaner: This tool will help you clean the battery terminals and prevent corrosion.
- New battery: Ensure that the new battery is the correct size and type for your vehicle.
- Optional: Battery terminal protector spray: This helps prevent corrosion on the battery terminals after installation.
Having all your tools ready will make the process much smoother, and you'll avoid running back and forth to get something you forgot.

NTB-National Tire & Battery
6315 Prentiss School Dr, Canal Winchester, OH 43110, USA
Step 2: Prepare Your Vehicle
Now that you have everything you need, the next step is to prepare your vehicle. It’s important to take some safety precautions before you start working with the car’s electrical system.
- Park your car on a flat surface: Make sure the car is in a stable position, and the engine is turned off. Engage the parking brake to prevent the vehicle from rolling while you work.
- Turn off all electrical components: This includes the lights, air conditioning, radio, and any other electronics. You want to avoid any electrical surges when disconnecting or reconnecting the battery.
- Wear your safety gear: Put on your gloves and safety glasses before proceeding.
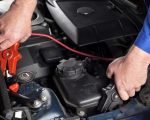
Step 3: Disconnect the Old Battery
Now, it’s time to get your hands dirty! The first thing you need to do is disconnect the old battery. This is critical because working with the electrical system while the car is still connected to power can be dangerous.
Start by locating the battery in your car. Most car batteries are found in the engine bay, but in some vehicles, they might be located in the trunk or under the back seat. If you’re unsure where the battery is, check your car’s manual for the exact location.
Once you’ve located the battery, you need to remove the negative terminal first. The negative terminal is usually marked with a minus sign (-) and is often connected to a black cable. Using your wrench, loosen the nut holding the negative terminal in place. Be careful not to let the wrench touch any other metal parts of the car while you do this, as it could cause a short circuit. Once it’s loose, gently pull the cable away from the battery terminal.
Next, disconnect the positive terminal. The positive terminal is usually marked with a plus sign (+) and is connected to a red cable. Loosen the nut and carefully remove the positive cable as well. With both terminals disconnected, you can now remove the old battery.
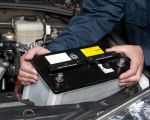
Step 4: Remove the Old Battery
Most car batteries are secured in place with a metal bracket or a strap. You’ll need to remove these fasteners before you can take the old battery out. Use your wrench to unscrew the bracket and carefully lift the battery out of the compartment. Be aware that car batteries can be quite heavy, so make sure you have a good grip on it. If the battery feels stuck, gently wiggle it to loosen it from its holder.
Step 5: Clean the Battery Terminals
Before installing the new battery, it’s a good idea to clean the battery terminals to remove any corrosion. Use a battery terminal cleaner, or a mixture of baking soda and water, to clean both the positive and negative terminals. This will help ensure a good connection when you install the new battery.
Use a clean rag to wipe away any excess solution and let the terminals dry completely before moving on to the next step.
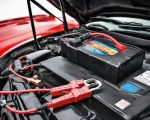
Step 6: Install the New Battery
Now comes the exciting part – installing the new battery! Carefully place the new battery into the battery compartment, making sure that the positive and negative terminals are aligned correctly with the cables. Be sure the battery is securely seated and doesn’t move around. If there’s a bracket or strap, fasten it back into place to hold the battery securely in the compartment.
Once the battery is secure, connect the positive terminal first. Slide the red cable onto the positive terminal and tighten the nut with your wrench. Make sure the connection is tight but avoid over-tightening, as this could damage the terminal.
Next, connect the negative terminal. Slide the black cable onto the negative terminal and tighten the nut. Again, make sure it’s snug but not over-tightened.
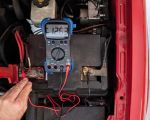
Step 7: Test the New Battery
Before you close the hood and call it a day, it’s time to test the new battery. Start your car and see if the engine turns on without any issues. Check that all electrical components, such as the lights and air conditioning, are working properly. If everything seems to be functioning as it should, then congratulations – you’ve successfully replaced your car battery!
Step 8: Dispose of the Old Battery Properly
Lastly, don’t forget to dispose of your old battery properly. Car batteries contain toxic chemicals and should not be thrown in the trash. Many auto parts stores or recycling centers offer battery recycling services. Simply drop off your old battery at one of these locations for safe disposal.
And that’s it! You’ve just replaced your car battery without professional help. It’s a simple process that saves you money and gives you the confidence to handle future car maintenance tasks on your own. The next time your car battery starts acting up, you’ll know exactly what to do.