If you’ve ever been in a situation where your car’s brakes felt a little "off," it might be time to check the brake fluid. As a car owner who has faced that uneasy feeling of a spongy brake pedal myself, I can tell you that it’s one of the most important maintenance tasks you can perform to keep your vehicle safe and in good working condition. In this guide, I’ll share with you everything I’ve learned about replacing brake fluid — from why it’s important, how to do it yourself, and what mistakes to avoid to ensure your safety and the safety of others on the road.

Brake Masters
24411 Main St, Santa Clarita, CA 91321, USA
Why is Brake Fluid Important?
Brake fluid is a hydraulic fluid that plays a crucial role in your vehicle’s braking system. When you press down on the brake pedal, the brake fluid transfers the force to the brake pads, allowing your car to stop. Over time, the brake fluid can absorb moisture from the air, which leads to a decrease in its effectiveness and can even cause rust and corrosion in the brake system. This is why it’s important to replace brake fluid regularly — usually every 2 to 3 years, depending on the manufacturer’s recommendation.
I remember the first time I felt my brakes weren’t performing as they should. The pedal seemed a bit soft, and I knew something was off. After doing a little research, I discovered that old or contaminated brake fluid could be the culprit. That’s when I decided to replace the brake fluid myself, and I’m glad I did. Not only did it save me money, but it gave me a sense of accomplishment knowing I was taking care of my car’s safety systems myself.

Little D's Muffler & Brakes
2970 S Winchester Blvd, Campbell, CA 95008, USA
Signs That You Need to Replace Brake Fluid
There are several signs that indicate your brake fluid may need to be replaced. These include:
- Spongy or Soft Brake Pedal: If the brake pedal feels soft or sinks to the floor when pressed, it could be due to air or moisture in the brake fluid.
- Brake Warning Light: If your brake system warning light appears on your dashboard, it could be a sign of low or contaminated brake fluid.
- Brake Fluid Color: Fresh brake fluid is usually clear or light amber, but if it’s dark brown or black, it’s time for a change.
- Unusual Noises: If you hear squealing or grinding sounds when applying the brakes, it could indicate that your brake fluid isn’t functioning properly.
Tools and Materials You’ll Need
Before diving into the brake fluid replacement process, make sure you have the following tools and materials on hand:
- New brake fluid (consult your car’s manual for the correct type)
- Wrench set
- Brake fluid bleeder kit
- Jack and jack stands (for lifting your car if needed)
- Clean rags or towels
- Gloves and safety glasses (brake fluid can be corrosive, so it's important to protect your skin and eyes)
- Container for old brake fluid
Step-by-Step Process for Replacing Brake Fluid
Step 1: Prepare the Vehicle
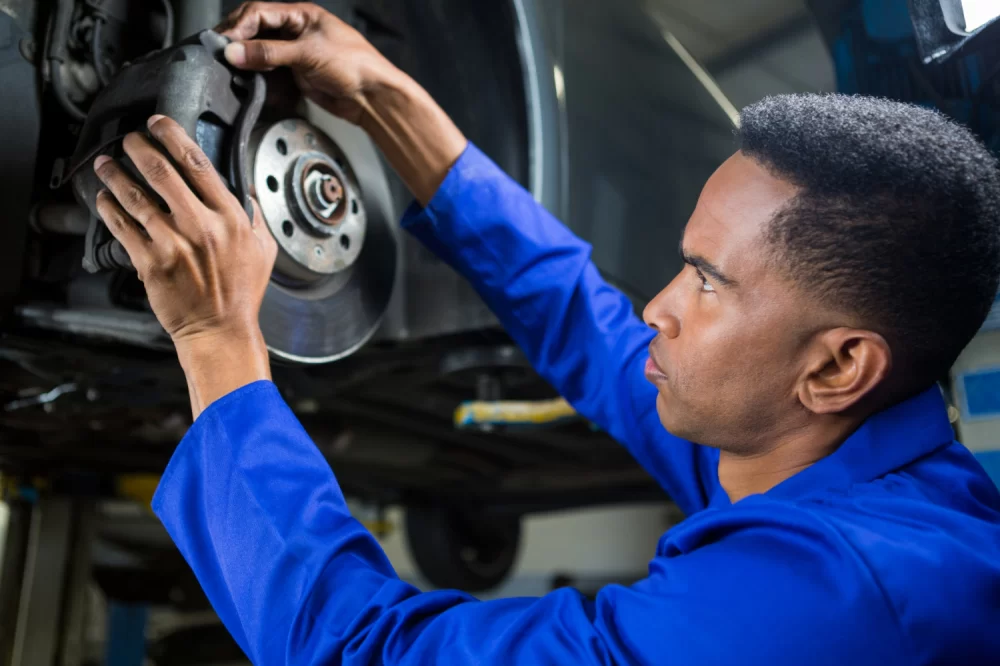
First, park your car on a flat surface and engage the parking brake. If you need to lift your car to access the brake lines, use a jack to raise the vehicle and place it securely on jack stands. Make sure the car is stable before you begin working. It’s also a good idea to wear gloves and safety glasses during the process to protect yourself from brake fluid splashes.
Step 2: Locate the Brake Fluid Reservoir
The brake fluid reservoir is typically located near the back of the engine bay, close to the driver’s side. It’s a translucent plastic container with a cap labeled "Brake Fluid." Open the cap and check the fluid level. If it’s low, you’ll definitely need to top it off or replace the fluid entirely.
Step 3: Begin the Bleeding Process
The brake fluid replacement process involves bleeding the brakes to remove the old fluid from the brake lines. You can do this by using a brake fluid bleeder kit. Start with the brake furthest from the master cylinder, which is usually the passenger-side rear brake. Attach the bleeder valve to the brake caliper and have a helper slowly pump the brake pedal. Watch for the old fluid to begin flowing out. Continue this process until you see fresh, clear brake fluid coming out of the line.
Step 4: Check the Fluid Reservoir
As you bleed the brakes, make sure to check the brake fluid reservoir frequently. If the fluid level drops too low, you risk introducing air into the brake lines, which can compromise your braking performance. Keep the reservoir topped off with fresh brake fluid as you go.
Step 5: Complete the Process for All Four Brakes
Continue bleeding each brake in order: passenger-side rear, driver-side rear, passenger-side front, and finally, driver-side front. After you’ve bled all four brakes, ensure that the brake fluid level is within the recommended range in the reservoir. Tighten the bleeder valves and cap the fluid reservoir securely.
Step 6: Test the Brakes
Once all the fluid has been replaced and the system is sealed, start the car and press the brake pedal. It should feel firm and responsive. If the pedal still feels soft or spongy, you may need to repeat the bleeding process or check for air in the brake lines.
Common Mistakes to Avoid
While replacing brake fluid is a relatively simple task, there are a few common mistakes that you should avoid:
- Using the Wrong Brake Fluid: Make sure to use the correct type of brake fluid for your car. There are different types (DOT 3, DOT 4, DOT 5, etc.), and using the wrong one can damage your brake system.
- Letting the Fluid Reservoir Get Too Low: Allowing the brake fluid level to get too low can introduce air into the brake lines, making your brakes unsafe. Always keep an eye on the fluid level during the process.
- Skipping the Bleeding Process: If you skip the bleeding process, you could leave air bubbles in the brake lines, which can lead to poor braking performance or complete brake failure.
Why Replace Brake Fluid Yourself?
Replacing your car’s brake fluid is a great way to save money on maintenance costs. While many car owners leave this task to professionals, it’s relatively easy to do yourself with the right tools and knowledge. Plus, it’s a rewarding feeling to know that you’ve taken care of an important safety feature of your car. I recommend this task for anyone who enjoys working on their vehicle and wants to improve their knowledge of car maintenance.
If you need any help with towing or are looking for auto repair services in your area, be sure to check out Rescue & Towing for reliable towing services and recommendations for the best repair shops near you.