How to Replace Car Fuel Injectors: A Step-by-Step Guide
Over the years, I’ve encountered a few car troubles, but one issue that really stood out for me was when my car’s fuel injectors started failing. It was one of those problems that started small – a slight rough idle, a decrease in performance, and eventually, a check engine light that wouldn’t go off. After doing some research and talking to a mechanic, I realized that replacing the fuel injectors could solve the issue. If you’ve found yourself in a similar situation, don’t worry – replacing fuel injectors is a manageable task with the right tools, and I’m here to guide you through the entire process.

J&J Auto Repair
2879 Lockbourne Rd, Columbus, OH 43207, USA
1. Understanding Fuel Injectors and Why They Fail
Before diving into the replacement process, it's important to understand what fuel injectors do and why they might need replacing. Fuel injectors are responsible for spraying a precise amount of fuel into your engine’s combustion chamber. If they’re not working correctly, it can lead to poor fuel efficiency, engine misfires, and even more serious engine problems.
There are several reasons why fuel injectors might fail. Over time, they can become clogged due to dirt or debris in the fuel, or they can wear out from regular use. Another common issue is when the seals on the injectors degrade, causing fuel to leak or burn inefficiently. It’s also worth noting that faulty injectors can cause your car to run too rich (too much fuel) or too lean (not enough fuel), both of which can result in poor engine performance and increased emissions.

Lopez Auto Repair
1290 W Mound St, Columbus, OH 43223, USA
2. Symptoms of Faulty Fuel Injectors
If you’re wondering whether your fuel injectors are the problem, there are a few common signs that could indicate an issue:
- Rough idling: When your car is idling, you might notice it shaking or vibrating more than usual. This can be a sign that one or more injectors are malfunctioning.
- Decrease in fuel efficiency: If you find yourself filling up more frequently than usual, faulty fuel injectors could be the culprit, as they may be delivering fuel inefficiently.
- Engine misfires: If your car hesitates or stutters while driving, it could be due to a faulty injector failing to deliver fuel properly.
- Check engine light: The check engine light might illuminate, and a diagnostic scan could show a problem with the fuel system, pointing to the injectors.
Once you identify these symptoms, it’s time to consider replacing the injectors. Keep in mind that working with fuel injectors can be dangerous, as you’ll be dealing with the fuel system, so always take proper precautions and work in a well-ventilated area.
3. Tools You’ll Need for Replacing Fuel Injectors
Replacing fuel injectors requires a few specific tools. Here’s what I recommend having on hand before you begin the job:
- Socket wrench set: You’ll need a set of sockets to remove various components like the fuel rail.
- Torque wrench: A torque wrench ensures that the new injectors are properly installed with the right amount of tightness.
- Injector puller: This tool is essential for removing the old injectors without damaging them or surrounding components.
- Fuel line disconnect tool: This tool is used to safely disconnect the fuel lines without spilling gasoline.
- New fuel injectors: Of course, you’ll need a set of replacement fuel injectors that match your car’s make and model.
- Sealant or O-rings: Sometimes the seals need replacing as well, so having new O-rings or sealant is essential to prevent leaks.
- Safety equipment: It’s important to wear gloves and safety glasses to protect yourself from any fuel or debris during the process.
4. Step-by-Step Guide to Replacing Fuel Injectors
Now that you’ve gathered all the tools and have a basic understanding of the process, let’s dive into the actual steps for replacing the fuel injectors.
Step 1: Disconnect the Car Battery
Before working with the fuel system, it’s crucial to disconnect the car battery. This will prevent any accidental sparks or electrical issues while you’re working. Simply use a wrench to remove the negative terminal from the battery.
Step 2: Relieve Fuel System Pressure
To avoid any fuel spraying out when you disconnect the fuel lines, you’ll need to relieve the fuel pressure. This can be done by removing the fuel pump fuse and running the engine until it stalls. This will release any pressure in the fuel system.
Step 3: Remove the Engine Cover and Other Components
Next, remove the engine cover (if applicable) to access the fuel injectors. Depending on your car’s design, you might need to remove other components like the air intake or throttle body to gain full access to the injectors. Be sure to keep track of screws and parts as you remove them.
Step 4: Disconnect the Fuel Lines
Using your fuel line disconnect tool, carefully disconnect the fuel lines from the fuel rail. Be prepared for a small amount of residual fuel to leak out, so have rags or a small container ready to catch it. If the fuel lines are difficult to disconnect, a little gentle prying should do the trick.
Step 5: Remove the Fuel Rail
The fuel injectors are mounted on the fuel rail, so you’ll need to remove the rail to access the injectors. Use your socket wrench to remove any bolts securing the rail in place. Gently lift the rail and the injectors out of the engine. Be cautious not to damage any of the components as you remove them.
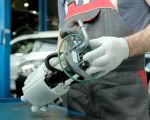
Step 6: Remove the Old Fuel Injectors
Once the fuel rail is removed, the fuel injectors should be easy to pull out. Use an injector puller if necessary to avoid damaging the injectors or the surrounding components. Take note of how the injectors are positioned so you can install the new ones in the correct orientation.
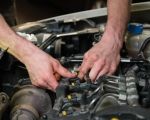
Step 7: Install the New Fuel Injectors
Before installing the new fuel injectors, it’s important to replace any worn seals or O-rings. Apply a small amount of lubricant to the new O-rings to ensure a smooth installation. Carefully insert the new injectors into the fuel rail, ensuring they are seated properly.
Step 8: Reinstall the Fuel Rail
Once the new injectors are in place, reinstall the fuel rail back into the engine, securing it with the bolts you removed earlier. Reconnect the fuel lines and ensure that everything is tight and secure.
Step 9: Reconnect the Car Battery and Test
Finally, reconnect the car battery and start the engine to test the new injectors. You should notice an immediate improvement in engine performance, with no more rough idling or misfires. If the engine runs smoothly and the check engine light stays off, you’ve successfully replaced your fuel injectors!
5. Additional Tips and Considerations
When replacing fuel injectors, there are a few additional things to keep in mind:
- Always check for leaks: After installing the new injectors, start the engine and carefully check for any fuel leaks around the injectors or fuel lines.
- Use OEM parts: Whenever possible, I recommend using original equipment manufacturer (OEM) injectors for your car. This ensures that they will fit and perform just like the originals.
- Consider replacing the fuel filter: A clogged fuel filter can affect the performance of your new injectors. Replacing the fuel filter while you're at it is a good idea.
Replacing your car’s fuel injectors may seem intimidating at first, but with the right tools and a little patience, it’s a task that can be done with confidence. If you’re not comfortable doing the job yourself, or if you don’t have the proper tools, don’t hesitate to reach out to a professional mechanic. For any towing or roadside assistance needs, feel free to visit Rescue & Towing for trusted service recommendations.