Using Jumper Cables to Jumpstart a Car: A Step-by-Step Guide
We've all been there—standing in front of our car, staring at a dead battery, wondering how we’re going to get the car started and back on the road. I’ve experienced it more than once, and the first time I faced a dead battery, I had no idea what to do. Thankfully, I had jumper cables in my trunk and a friend to help me out. It wasn’t as difficult as I initially thought, but I learned a lot through the experience. In this article, I’ll walk you through how to safely use jumper cables to jumpstart a car, explain the key precautions to take, and share tips I’ve picked up along the way to make sure you never feel unprepared in an emergency again.
1. Understanding the Basics of Jumper Cables
Before jumping straight into the how-to guide, it’s important to understand what jumper cables are and why they work. I remember being a bit confused when I first saw jumper cables, wondering how these simple wires could actually make my car start. Jumper cables are long, insulated wires with clamps at each end, designed to transfer electricity from one vehicle’s battery to another’s. The process is based on the principles of electrical circuits and battery power transfer. The key here is that a car battery stores electrical energy, which is used to power your car’s systems. When a battery is dead, you can jump-start it using another battery, providing the boost it needs to start your car.
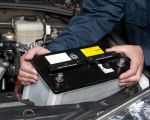
1.1 The Components of Jumper Cables
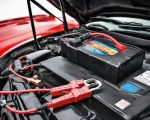
Jumper cables consist of four main components:
- Clamps: These are the metal parts that attach to the car batteries. They come in red (positive) and black (negative) colors.
- Cables: The cables are thick wires that conduct electricity from one battery to another. The thicker the cables, the better they can handle the transfer of power.
- Insulation: The outer material of the cables, which prevents electrical short circuits or shocks when handling the cables.
- Jumper Box (Optional): In some cases, instead of relying on a second car’s battery, a portable jump starter box can also be used to jump-start the vehicle.
2. How to Use Jumper Cables to Jumpstart a Car
Now that we know the basics of jumper cables, it’s time to jump into the actual process of using them to jumpstart your car. The first time I used jumper cables, I was surprised at how easy it was once I understood the steps involved. Here’s a detailed step-by-step guide on how to safely and effectively jump-start a car using jumper cables:
2.1 Step 1: Ensure Safety
The very first thing I always do before jumping a car is to make sure I’m in a safe location. When I was stranded on the side of the road one evening, I made sure that both cars were parked in a safe, well-lit area away from traffic. Make sure the cars are in “park” (or “neutral” if it’s a manual transmission) and the engines are off. This is important because it ensures the safety of both vehicles during the jump-start process. I also recommend wearing gloves, as you’ll be handling metal parts and electrical components.
2.2 Step 2: Position the Cars
Next, I positioned both cars so that they were close enough for the jumper cables to reach the batteries. You don’t need to have the cars touching, but they should be within a reasonable distance—usually about 18-24 inches apart. It’s a good idea to make sure the cars are not facing each other directly, as this can cause accidental contact. I also ensured that the engine of the car providing the jump was running before proceeding.
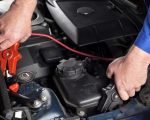
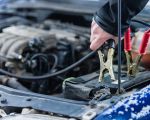
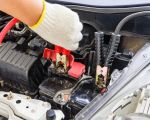
2.3 Step 3: Attach the Red (Positive) Clamp
The first cable I connected was the red one, the positive cable. I clipped one end of the red cable to the positive terminal of the dead battery. The positive terminal is usually marked with a "+" sign, and it’s important to ensure the clamp is firmly attached to the terminal. I’ve learned that securing this connection tightly is crucial because a loose connection could prevent the transfer of power.
2.4 Step 4: Attach the Other Red Clamp to the Good Battery
Once the red clamp was attached to the dead battery, I connected the other red clamp to the positive terminal of the good battery. This process is crucial because both batteries need to be connected correctly for the jump to be effective. At this point, I made sure there were no sparks or signs of improper connections before moving on.
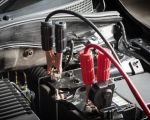
2.5 Step 5: Attach the Black (Negative) Clamp to the Good Battery
Next, I attached the black (negative) clamp to the negative terminal of the charged battery. The negative terminal is usually marked with a "-" symbol. This connection is safe to make after the positive connections are secure, but it’s important to avoid grounding the connection directly to the car’s frame or body. I’ve always been cautious here to ensure no sparks are generated from improper placement of the clamp.
2.6 Step 6: Attach the Other Black Clamp to the Car Frame
The last step for me was attaching the other end of the black (negative) clamp to a grounded metal part of the car that’s receiving the jump (the one with the dead battery). This can be a clean, unpainted metal area of the car’s engine block. I learned that grounding the negative cable properly is key to safely completing the jump-start process. Never attach the black cable to the negative terminal of the dead battery, as this could cause a dangerous spark or short circuit.
2.7 Step 7: Start the Working Car
With everything connected, I started the engine of the working car and let it run for a few minutes. This allows the good battery to transfer power to the dead battery. I learned that idling the car for a few minutes will help provide the necessary voltage boost. I’ve found that sometimes, if the dead battery is too far gone, the car may need to be revved up a little to help the power transfer more efficiently.
2.8 Step 8: Start the Dead Car
After a few minutes, I attempted to start the car with the dead battery. In most cases, after a little cranking, the car should start. If it doesn’t, I would suggest waiting a bit longer or trying again. It’s important not to force the start too much, as it could damage the electrical system.
2.9 Step 9: Disconnect the Cables
Once the car starts, I carefully begin to disconnect the cables in the reverse order that I attached them, starting with the black clamp on the grounded metal part of the dead car. I always ensure the clamps do not touch each other or any other part of the car during disconnection. After all cables are removed, I let the car run for a while to ensure the battery gets enough charge to stay operational.
3. Troubleshooting Common Issues with Jump-Starting
Even with all the right steps, there are times when jump-starting doesn’t work as expected. Over the years, I’ve learned to troubleshoot a few common issues. Here are a couple of scenarios that could indicate problems beyond just a dead battery:
3.1 The Car Doesn’t Start Even After Jumping
If the car doesn’t start after a few attempts, it could be a sign of a more serious issue, like a faulty alternator or a completely dead battery. In my case, this happened once, and I had to call for roadside assistance to have the car towed to a mechanic.
3.2 Sparks or Weird Sounds During Jumping
If you see sparks or hear strange noises when connecting the jumper cables, it could indicate an improper connection or a malfunctioning component. Always double-check your connections and ensure the cables are secure.
4. Tips for Preventing Future Battery Problems
After experiencing a dead battery a few times, I’ve learned the value of preventative measures. Here are some of the most effective steps I now take to ensure my battery stays healthy:
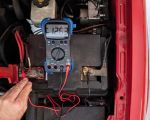
4.1 Regularly Check Battery Health
Checking the battery’s charge and condition regularly helps ensure that I’m not caught off guard by a dead battery. Many auto stores offer free battery testing, and I highly recommend this service every six months.
4.2 Keep the Battery Clean
Keeping the battery terminals clean and free of corrosion can help ensure a solid connection. I always use a mixture of baking soda and water to clean the terminals, and it’s a simple, effective solution to avoid unnecessary issues.
4.3 Replace the Battery on Time
If your battery is over three years old, it’s time to start thinking about replacing it. I’ve learned that batteries don’t last forever, and proactive replacement can prevent unexpected breakdowns.
5. Conclusion
Learning how to use jumper cables to jumpstart a car is a valuable skill that can save you time, money, and stress. Having jumper cables in your trunk is an easy way to be prepared for emergencies, and knowing how to use them safely and effectively will help ensure that you never get stranded without help. By following these simple steps and troubleshooting tips, you can confidently handle any situation where your car battery fails.